Battery switch on travel trailer function is crucial for managing your RV’s power. Understanding how your battery switch works is key to avoiding dead batteries and electrical problems. This guide covers various switch types, their operation, troubleshooting tips, and essential safety precautions. We’ll walk you through everything from basic operation to advanced maintenance, ensuring you’re confident in handling your travel trailer’s electrical system.
We’ll explore different battery switch types – rotary, rocker, and digital – comparing their pros and cons, including cost, ease of use, and reliability. You’ll learn how to correctly operate your switch, switch between battery banks, and troubleshoot common issues like switch failure or corrosion. Proper wiring and maintenance are also covered, along with essential safety guidelines to keep you and your RV safe.
Types of Battery Switches in Travel Trailers
Choosing the right battery switch for your travel trailer is crucial for managing your power sources effectively and preventing accidental drain. Several types are available, each with its own advantages and disadvantages. Understanding these differences will help you make an informed decision based on your needs and budget.
So, you’re prepping for a road trip? Awesome! First things first: make sure you understand your travel trailer’s power system. Knowing how to use the battery switch is crucial – check out this guide on the battery switch on travel trailer function to avoid any dead battery surprises. Once you’ve got that sorted, think about your entertainment.
For the ultimate audio experience on the road, you might want to look into setting up an audiophile travel setup ; it’ll make those long drives way more enjoyable. Happy travels!
Rotary Battery Switches
Rotary switches are a classic choice, often found in older travel trailers. They typically feature a rotating dial that allows you to select different battery configurations (e.g., battery 1 only, battery 2 only, both batteries combined, or off). The internal mechanism involves a series of contacts that are rotated into position to connect or disconnect the batteries.
Rocker Battery Switches, Battery switch on travel trailer function
Rocker switches offer a more modern and often more compact design compared to rotary switches. They use a lever-like mechanism that moves back and forth to select between different battery configurations. Internally, these switches use a similar contact system to rotary switches, but the actuation is different.
Digital Battery Switches
Digital battery switches represent the most advanced option. These switches typically feature a digital display and often incorporate additional features such as voltage monitoring, load sensing, and remote control capabilities. The internal mechanism utilizes electronic components to manage the switching process.
Comparison of Battery Switch Types
The following table summarizes the pros and cons of each type:
| Type | Cost | Ease of Use | Reliability |
|---|---|---|---|
| Rotary | Low to Moderate | Moderate | Generally High, but moving parts can wear out over time. |
| Rocker | Moderate | High | Generally High, fewer moving parts than rotary switches. |
| Digital | High | High | Generally High, but electronic components can fail. |
Battery Switch Function and Operation
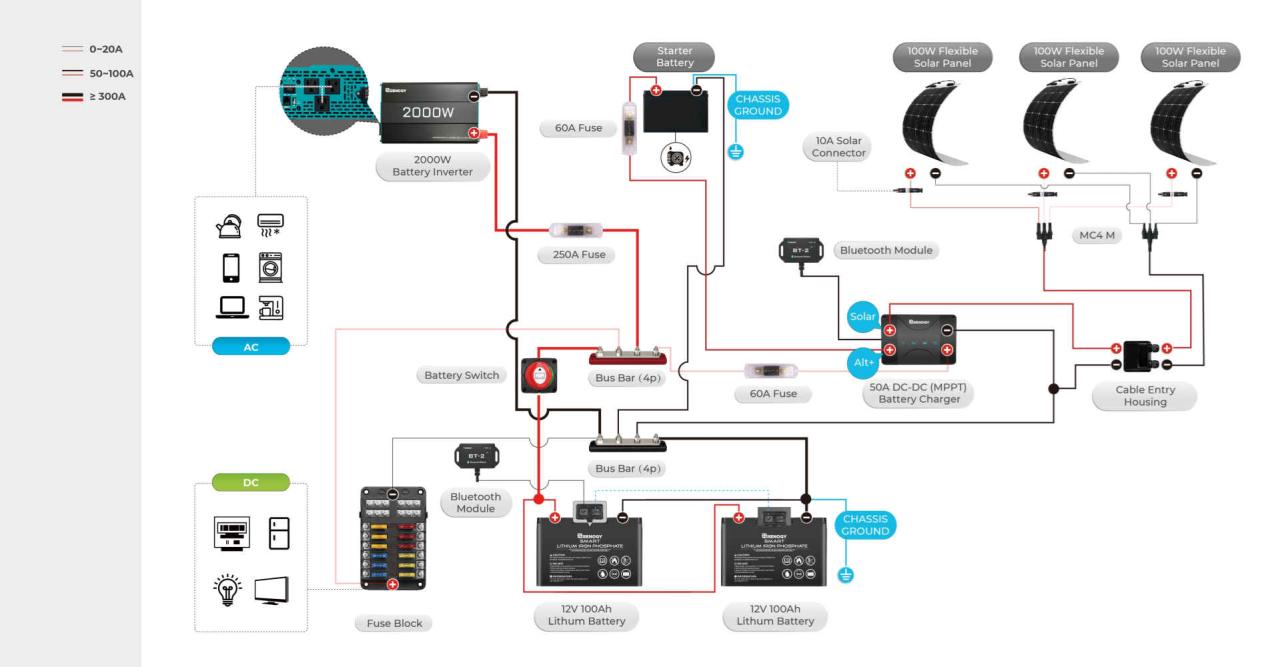
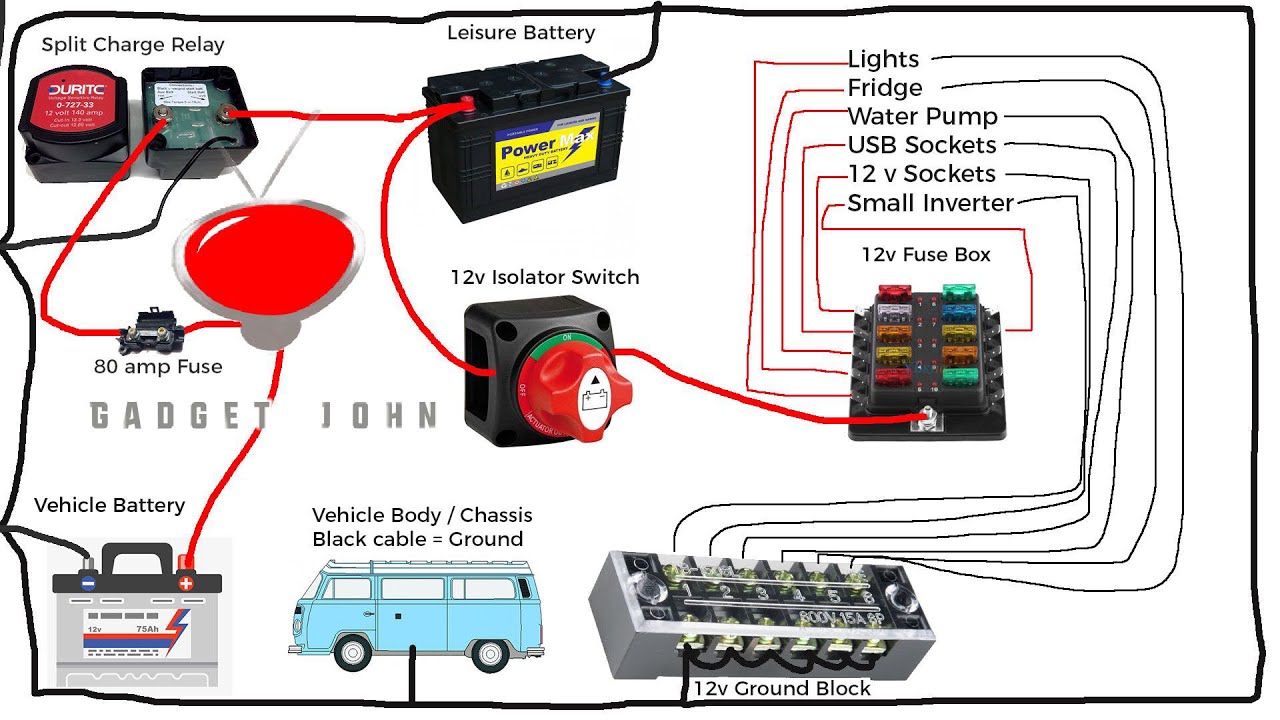
A battery switch is the crucial control center for your travel trailer’s power, allowing you to select which battery bank (or banks) provide power to your appliances and systems. Understanding its function and operation is vital for safe and efficient use of your RV’s electrical system. Proper use prevents accidental drain of your house batteries, and helps extend their lifespan.The battery switch acts as a selector, directing power from either your main (starting) battery, your house batteries, or both, to the trailer’s electrical system.
This is essential because your starting battery powers the engine, while your house batteries supply power to everything inside your RV, like lights, appliances, and other 12V devices. Some switches also allow you to completely disconnect all batteries to prevent parasitic drain when the trailer is stored for extended periods.
Battery Switch Operation
Correct operation of your battery switch is paramount to avoid electrical issues and battery damage. Always refer to your specific switch’s instructions as designs can vary. However, general safety precautions and operating procedures are consistent across most models.Before interacting with any electrical components, always ensure you’ve turned off all appliances and devices running on the 12V system within your travel trailer.
This prevents electrical surges and protects the switch and your batteries. Additionally, it’s a good practice to wear gloves, as battery terminals can be corrosive.
So, you’re prepping for your next adventure in your travel trailer? First things first: make sure you understand the battery switch on travel trailer function – it’s crucial for managing your power. Once you’ve got that sorted, think about setting up the entertainment; a killer audiophile travel aetup can really elevate the experience.
Don’t forget to pack your favorite tunes!
Switching Between Battery Banks: A Step-by-Step Guide
This guide assumes a typical two-battery setup (one starting battery, one house battery). Consult your owner’s manual for specifics relating to your setup.
- Locate the Battery Switch: Usually found near the batteries themselves or inside a convenient access panel.
- Identify Switch Positions: Most switches have clearly marked positions for “Off,” “Start,” “House,” and “Both.” Some may also have a “Storage” position for completely disconnecting the batteries.
- Switch to “Off”: Begin by turning the switch to the “Off” position. This completely disconnects both batteries from the trailer’s electrical system.
- Select Desired Position: Turn the switch to the desired position: “Start” to power only the starting battery (for engine starting), “House” to power only the house battery (for running appliances), or “Both” to power both batteries simultaneously (usually for charging or running high-power appliances).
- Verify Power: After switching, check that the desired appliances or systems are receiving power. If not, double-check the switch position and ensure all fuses are intact.
Maintenance and Upkeep of Battery Switches
Keeping your travel trailer’s battery switch in good working order is crucial for reliable power and to prevent potential electrical problems. Regular maintenance ensures the switch operates smoothly and extends its lifespan, preventing costly repairs or inconvenient breakdowns on the road. Neglecting maintenance can lead to corrosion, poor connections, and ultimately, switch failure.Regular inspection and cleaning are key to maintaining your battery switch.
A simple maintenance schedule can prevent significant issues down the road.
Battery Switch Maintenance Schedule
A recommended maintenance schedule includes a visual inspection at least twice a year, before and after your main travel season. More frequent checks are advised if you frequently use your trailer in harsh environments (e.g., coastal areas with high salinity or extremely dusty conditions). Additionally, a more thorough cleaning and inspection should be performed at least once a year, preferably before storing your trailer for an extended period.
Cleaning and Inspecting the Battery Switch and Connections
Before starting any maintenance, always disconnect the negative battery cable to prevent accidental short circuits. This is a critical safety precaution. Once disconnected, carefully inspect the switch for any signs of corrosion, loose connections, or damage to the casing. Corrosion often appears as a white, green, or blue powdery substance around the terminals and switch body. Use a wire brush or a specialized battery terminal cleaner to remove any corrosion.
For stubborn corrosion, a baking soda and water paste can be effective. After cleaning, apply a corrosion inhibitor, such as dielectric grease, to the terminals and connections to prevent future corrosion. Tighten all connections to ensure a secure fit. Visually inspect the wires for any fraying or damage; replace any damaged wires immediately. Finally, reconnect the negative battery cable and test the switch to ensure it operates correctly.
Extending the Lifespan of a Battery Switch
Proper maintenance significantly extends the life of your battery switch. Using a corrosion inhibitor, as mentioned above, is vital. Additionally, keeping the switch and its surrounding area clean and dry helps prevent corrosion. Avoid excessive vibration by securing the switch properly. Regularly checking for loose connections and tightening them prevents overheating and potential damage.
If you notice any signs of malfunction, such as overheating or difficulty switching, address the issue immediately to prevent further damage. Finally, consider using a high-quality battery switch designed for the demands of a travel trailer environment; this initial investment can save you money and hassle in the long run.
Mastering your travel trailer’s battery switch is essential for a smooth and enjoyable RV experience. By understanding the different switch types, their operation, and troubleshooting techniques, you can prevent electrical problems and extend the life of your battery system. Remember to always prioritize safety when working with your RV’s electrical system. With the knowledge gained here, you’ll be equipped to confidently manage your power and enjoy worry-free adventures on the road.
FAQ: Battery Switch On Travel Trailer Function
What is the amperage rating I should look for in a battery switch?
The amperage rating should match or exceed the total amperage draw of your appliances and systems. Check your RV’s specifications for this information.
How often should I clean my battery switch?
Inspect and clean your battery switch at least once a year, or more often if you notice corrosion or buildup.
What should I do if my battery switch feels hot to the touch?
A hot battery switch indicates excessive current draw. Turn off the switch immediately and check for short circuits or overloaded circuits before further use.
Can I use a battery switch from a different type of RV?
While possible, it’s crucial to ensure the amperage rating and number of battery banks are compatible with your RV’s system. Incorrectly sized switches can cause damage.
